How utilizing shadow tables for field validation in Sage 100 can increase your efficiency and gain you back time.
Have you ever needed to validate a UDF in one entity in Sage, against records in another entity?
For example, if you have custom items for a specific customer, it could be useful to have a selection field on the Item Record, where you can select from existing Customer records in Sage.
One easy way to accomplish this is via setting up a shadow table that copies the values from the existing AR_CUSTOMER table in Sage to a UDT, which can be used in field validation.
Our first step in this process is setting up a UDT to hold our customer shadow data.
Note: You can put as many fields from AR_CUSTOMER in this as you want, but for selecting customers it can be as simple as just the Customer Key, and Name. Part of this code is commented out, which pertains to AR Divisions, if this is enabled in your system you may need to make adjustments.
View this Sage 100 step by step software tip in a video format (7:21)
View this Sage 100 step by step software tip with individual screen shots below.
1. Custom Office – User-Defined Field and Table Maintenance

2. Right-click Accounts Receivable > Add a User-Defined Table

3. Fill in the table name, and set up the unique key column for the UDT
Note: Field length is set to 23 so it can work if divisions are turned on since the division logic is set to ARDivisionNo + “-“ + CustomerNo (20 + “-“ + 2) = 23 characters.

In this example, we also added another field to hold the customer name and made it more than long enough to hold what Sage would allow for customer names.
4. Field additions can be done on the following screen by clicking the green plus button. Click update.

Once the table is set up, we can set up some simple scripting on AR_CUSTOMER.
5. In Module Menu > Select Custom Office > User-Defined Field and Table Maintenance

6. Accounts Receivable > AR Customer Master > Right-click, user-defined scripts

We will add two triggers to this table, each with its own script.
7. On the following screen click the green plus button to add a script trigger

8. Table – Post Delete > DeleteCustomerShadow


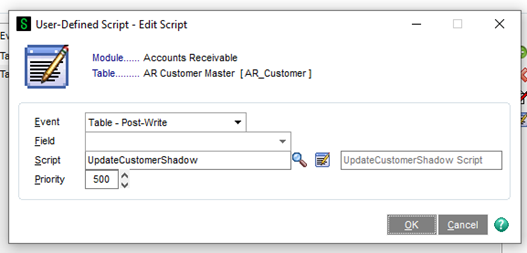
9. Table – Post Write > UpdateCustomerShadow


The post-delete script will handle removing records from our Shadow Table if a customer is deleted, and the post-write script will handle adding records to the table as they are created or updated.
Note: BOI scripting requires that “Allow External Access” is flagged on the Preferences Tab in Library Master > Main > Company Maintenance.
Once this is all in place, you can see records added to the UDT whenever a customer is created/updated.

Note: This will only add new/updated customers to the table, if you have existing customers you will need to load them manually into the table via Visual Integrator Imports.
The final step is adding a UDF to the CI_ITEM table that we will tie to this new UDF
10. Custom Office > User-Defined Field and Table Maintenance

11. Common Information – CI_ITEM > Edit Fields

12. A new field called UDF_CUSTOMER, a manual entry

13. Tab 1 Attributes – Maximum length 23

14. On tab 2 Validation, set validation to the user-defined table, and select the new customer shadow UDT. Click OK.

You can then add the field to display in Item maintenance and begin using it.

The key feature this shadow table provides is a lookup box that can select values we would typically find in the customer table, without requiring manual updates.
If you have questions or would like assistance utilizing shadow tables for field validation in Sage 100, please contact our Sage 100 support team at 260.423.2414.
Register for our Sage 100 newsletter today!
Copyright 2024 DWD Technology Group | All rights reserved. This article content may not be reproduced (in whole or in part), displayed, modified or distributed without express permission from the copyright holder.
